|
Written by Master Elshoff
|
|
Friday, 09 April 2010 00:00 |

Parts:
- (1) 4x8 sheet of plywood
- (4) 8 ft 2x2 studs
- (4) 2x16 sq. concrete stepping stones
- (64) nails/screws
- (2) cans of gray spray paint
- (2) gargoyles/ornamental tops
|
Description:
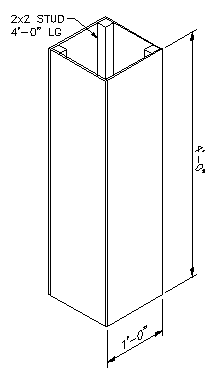
The parts list above is enough to make two columns. First take the 4X8 sheet of plywood,and cut it into 8 pieces, 4 ft x 1 ft. Then cut the 2x2s in half, so you should now have (8) 2x2 studs each 4 ft long. Then put 4 nails/screws in the 2x2s along one edge of the plywood, do this 8 times. Next, take two of these sections, and nail/screw them together so the edge with no stud on it is on the end of the other section with the edge with stud on it. It should look like the picture to the right where the two pieces overlap each other and hide the wood. Do this with four pieces until you have something that looks like the above picture. Then spray paint the whole thing gray. Now take one of the concrete stepping stones, and place it on the ground. Then put the wood box you just made on top of it centering all four sides. Then place another concrete stone on top, and add your gargoyle or other such item to complete it. It is possible to create wooden boxes that are the same size as the stepping stones by constructing a frame from 2x2 studs with mitered corners, and then capping them off with a 15 3/4" square piece of plywood. Also, do the same on the bottom, except it will be just a collar style.
The other option, which is pictured above, was made from two old pallets, that were cut right next to the center support, and then the extra pieces from the cut off side were used to fill in the gaps between boards. Then two 4x4's were inserted on either side of the pallets, right next to the outside 2x4's that made up the pallet. Then small pieces of wood were attached to either end under the middle board to create the rocking motion. Also, the uprights for the handrail were attached with lots of 3" screws going in a different angles to make the connection strong enough for a person's weight. Lastly, the rope was tacked on the top to add that old bridge look.
|
|
Last Updated on Tuesday, 22 October 2013 13:32 |


