| Corpse |
 |
 |
 |
Description:
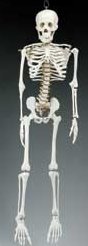
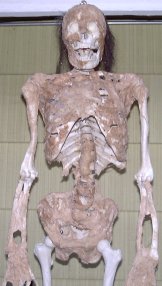
Start off with your bucky (skelton) from www.buckysboneyard.com and you can either purchase a corpsing kit from Gore Galore, or get your own parts. Then take the batting and seperate it into thin sections and place them on the table next to the skeleton. Pour some of the latex into a medium sized bowl or pie tin and grab a brush. Now there are two ways to apply the batting. One is to brush the latex on a small portion about 6 inches square and then attach the batting on top of that square and paint over it with more latex. The other way (which uses more latex but works better) is to dip the batting in the bowl of latex, and then ring it out and styretch it over hte skeleton. After the latex is applied you should stretch it and tear it so you get small section that show the bone and insides of your skeleton below. Do this all over the body, avoiding any joints where you still want movement to be uninhibated. You can even form lips, ears, noses, eyebrows, and other features if you want your corpse to look more freshly dead. Just roll up some of the batting or use cotton to achieve this effect. One thing to remember though while adding the layers is to make sure you cover all the bolts and other such hardware that sticks out and makes the skeleton look like it is bolted together. After all the latex and batting is attached you should have something that looks like the picture to the right.
Now on to painting. There are many methods of painting, and the easiest way to find the methid you want to use is to determine the location that the corpse will be first. If he is going to be in the dark then you don't need as much detail, and you can just use a spray can like mine. If you want more detail then maybe an airbrush or hand paintbrush techniques would be better. Spray painting is easy, just start with the deepest section first, like the inside of the body, eyes, and other deep set features. Paint them all black or some other dark color. Then come back with a lighter color such as dark brown and hit the outer surface of the skeleton making sure to vaoid the dark areas, or holding the can at an angle to where the paint can't get inside the holes very easily. Last take green or gray paint and add some variation her and there. he should now be good enough for a dark area in the haunt. Hand brushing the skelton is very similar to the air can, except you can get the colors on there with a littel more control. Start witht he darkest deepest set colors first, and then work outwards. The nice thing about a brush is that you can add more water or less water to you paint to achieve different effects. If you add a lot of water to the paint, you get what is called a wash,a nd then when you paint it over your skeleton it will run into the cracks, and settle there. make sure you wait until the base colors are dry before you add the wash though, or you may just end up blending all your colors together. Then once you wash is dry you can come back and do it again if it is not dark enough. Then we can move on to the next method of painting, dry brushing. This merhod is great for mold, dirt, or any other features that settle on the outer surface of you skelton. To do this just put some paint on the brush, and then wipe it off on a towel or some oher surface that you don't need until it is barely leaving any paint. Then lightly drag the brush over the high spots to create mold (green paint), dirt (light brown paint), or dust (gray paint). If you want you can try dabbing the brush to get it deeper in the cracks, or using a little more paint on the brush if it is too faint to see. You may even try using wood stain in various colors instead of paint.
|
||||
| Last Updated on Wednesday, 15 January 2014 13:43 |

 If you want to add hair, do this now. You can use the crepe hair, dorp (jute), or any other finely wound twine that resembles hair. I like mine to be darker colors, but you can always change this a little when painting.the easiest way to add the hair is to seperate out some strands, and then paint some latex on the crown of the skull. Stick the hair in the latex, and paint more on top in an upward motion. Then go up an inch or so and add another layer until you have the hair going as high on the head as you want. If you do not want the balding look like mine, you can just attach the last bit of hair in the center of the strand and have the ends going over each side.