| Shield (Foam) |
 |
 |
 |
Description:
Once all this is done paint all the side that will be glued together with Dap - Weldwood Original Contact Cement (red can). Let it dry for about 10 minutes or until tacky, and then stick all the pieces together. Make sure you get it right on the first try, once it sticks, your set. You will also want to make sure that whatever shape you wish your final shield to be in is how the shield is sitting when you apply the parts together. I wanted my shield to have a curved shape to it, so I took a sheet of thin plywood and laid it on the ground, then I placed 2x4's under each side to create a void under the middle. I added heavy weights on either end of the ply so it created the bow in the wood to get the shape I wanted. Then I placed the first piece of foam on the plywood, and added the back piece over it making sure it was lined up. I set heavy weights on it and let it dry over night. (You can glue all the pieces this way now, or add the thinner foam frame and crest after the first two layers dry.) Once the shield is all dry take it to a bandsaw or use a brand new razor to cut along the pattern outline so all of your edges match up and you get a clean edge. If you have some that are a bit wonky, you should be able to sand them back into shape. Lastly stick on your felt pads in the places you would like rivets and you're ready for the Plasti-Dip. This stuff releases fumes big time, so make sure you do this outside, or wear a mask and have plenty of ventilation! If you have the spray on kind, you can spray directly on the foam, it will not eat it. If you have the brush on kind make sure you thin it out a bit with some Naphtha or other such thinner because it comes out a bit thick. You can double up by spraying it on first, and then painting with the foam brushes over the wet sprayed on parts since the spray on kind already has a thinning agent in it, and will help thin out the brush on kind. If you skip this step, you will get globs of Plasti-Dip in areas you don't want it. One it is all dry (give it a few coats), you can paint the shield to suit your tastes. I suggest an acrylic paint and possibly a clear coat spray finish to protect it afterwards.
|
||||
| Last Updated on Wednesday, 04 February 2015 14:25 |

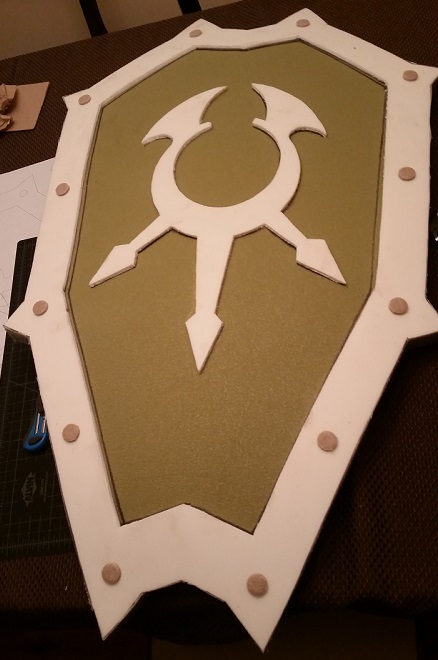 Figure out what size of shield you would like, and then take a sheet of newspaper or the like and fold it in half length-wise. Draw half of your shield on the paper so the fold will be the middle. Then unfold your template, and place it over one half of the camp pad. Make sure that you will be able to fit at least two shield templates over the foam. Cut out both pieces of the shield using your template, but add about 2 inches of space around the outside edge; we will cut this all off once they are all glued together. Do the same on the thinner foam (Landau Pad) and cut out the middle. This will make your frame around the edge of he shield. lastly cut out your crest for the center of the shield.
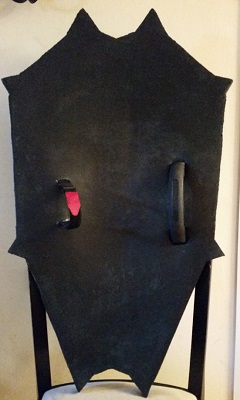 Now figure out where you would like your handle and arm strap, then unscrew the metal plate from the trowel. Find some heavy cardboard or leather scraps and then two washers to prevent the screws from pulling through the leather/cardboard. Now cut two slits in one piece of leather for the Velcro strap to go through as well as in one piece of the foam. Lace the strap through both the leather and the foam leaving the buckle portion on the side where you only see foam. Then attach the handle to the leather by running screws through the leather and the foam so the handle is also on the foam only side. It should look something like the picture on the left. One option is to add Duct tape around the edges of the leather/cardboard to make the edge less pronounced.