
| Cave |
|
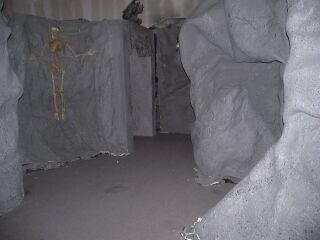
Description:The Scene- As the guest wander into this dark and dismal cave the hear dripping water, and see pools and shadowy creatures that lurk in the dark places. As they plunge deeper in, the very shadows on the walls come to life and spring out at them!
First thing we did was to layout the shape of the cave with wall panels, and you'll want to make it as random as possible. Then we took 1x3's and screwed them together at random angles where we wanted major projections in the cave wall. We even made a slight arch (top picture) in one area where the walls were close together. Don't worry about making the structure for every part of the cave walls, the screen and foam can handle a lot of it and is still strong. Once all the wood framing is compete, use your metal screen door material to cover over it and really go wild to give it a rougher and less flat look. We got an 8' wide roll that did most of the cave, and an additional 4' wide roll for filling in areas that were too large for the 8 footer to completely cover. Once all the surfaces are covered with the screen, go back and add little cones here and there to resemble stalactites, and maybe a few pointing up for stalagmites. Real stalactites are created from minerals in the water collecting from dripping spots and building up over time, so your stalagmites would usually be found directly under the stalactites, and may even merge together to form columns. You may even want to add some pools and line them with pond liner; or some other features of interest. After you have the layout of the cave all covered and looking like a see-through cave wall, go back and crunch up some of the areas that are a little too smooth, but don't worry about small details, or little wrinkles in the screen. The foam spray will fill in small gaps (up to 6" deep or more), and may even remove details and other things that aren't too large. Now bring in the spray foam company and let them do their thing. Make sure you can supervise so they don't miss anything and point out areas that look like wrinkles or folds and have them fill them in. Make sure you wear some sort of mask or leave the room often so you don't breathe the stuff. The foam will really expand and can fill in some amazingly huge gaps. You can usually find the foam company in the phone book under insulation, that is what their primary purpose is. After the foam is set up it will form a surprisingly hard shell, and can be painted. Using a air powered sprayer or just brushing the paint on is the best way; you do not want to use aerosol spray cans since it will eat the foam. After giving the foam a base color of gray, go back and add highlights in areas with different shades of gray or blue. You could even do a splatter paint job with lighter and darker shades to make it look more realistic, though depending on how dark you make your cave, it may not even show up. To make you cave look a little more realistic, you can add some cheesecloth dyed to look like roots, etc. Actors- If you plan on having actors in your cave, make them some hiding places by hollowing out areas about the size of a person, or making the cave walls in an "S" shape allowing them to hide in the curves. The actors we used were representing shadow creatures; they basically had dark cloaks and black faces. They could hide in the darkness and leap out at the guests as they passed by. Optional creatures could be pond monsters, or wild creatures you would typically find in caves. Lighting- This part can be tricky to make it look like real light sneaking into the cave. If you have areas where you left gaps in the foam or make little pools or nooks and crannies, you can shove small lights inside as if sunlight is peaking through here and there. Blue lighting shining on pools or just hidden behind stalagmites and projecting upwards adds a nice touch. If you have the room off of you cave like we did (Fire Marshal may require this), you may just add colored lighting coming in from the ceiling, or even ambient light may be enough. There is no real hard and fast rule of how this should be done, but you can totally change the look of your cave based on the angles and amount of light you add. If you plan on having actors in the cave make sure you keep it dark enough and provide plenty of shadowy areas for them to hide in. Sound- The sound for this room is typical "cave" sounds. Dripping water, echoes, wind, rats, etc. all add an element to this set that takes it to that believable level.
|
||||
| Last Updated on Tuesday, 22 October 2013 13:27 |
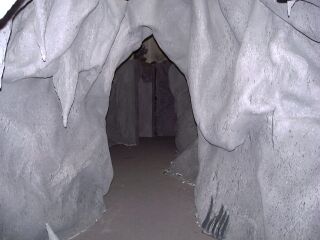
 Layout- The cave was constructed by attaching various lengths of 1x3's to wooden walls and then covering the whole thing with screening material. Then just call in a spray foam company let them cover it all up, and once it's dry spray paint it gray and add blue (or some other color) of highlights here and there.