ONE MAN'S
VERTICAL SYSTEM (Revision #26)
My name is Bob Johnson, NSS # 35023. I
have been the Willamette Valley Grotto's vertical chairman for over 25
years. I have been setting up vertical
caving rope practices with an obstacle course.
I try to simulate real cave conditions the best I can in the practice
area. I like doing vertical rope work so
I wanted to be able to do all of the obstacle courses easily. This forced me to modify my system many times
to make it the easiest for all possible situations. I also wanted it simple and not too
expensive. When fellow cavers would let
me explain my system and tried it, they all wanted me to write to the NSS to
share the features of my system. So here
goes!
FIRST THINGS FIRST
The
first thing that I would like to do is to quote an article from the book
"On Rope," Copyright 1987 National Speleological Society, entitled
"Climbing Systems" on page 173, reprinted with permission from the
NSS:
"The
ideal climbing system should enable the climber to move comfortably and
efficiently up the rope. It should
provide a secure attachment to the rope, yet be easily removed as well as
attached. It should fit the climber
properly, be easily taken on and off with ease.
It should be lightweight and not bulky.
A good system is versatile, able to accomplish a variety of tasks such
as being transformed into a rescue haul system.
It should be redundant so that any failure will not place the climber in
immediate danger. After a component
failure, it should have the versatility to be transformed into a system
enabling the climber to continue up or down safely. A system should be durable and incorporate
interchangeable replacement parts. A
good system climbs a wall as well as a free drop and allows a climber to ascend
over difficult lips. Systems that fit
climbers of different sizes are useful during rescues and training
seminars. A great system incorporates
the ability to downclimb."
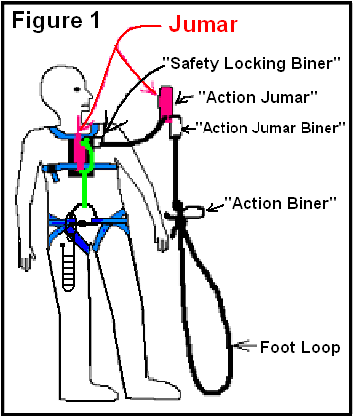
DESCRIPTION / CONSTRUCTION
(See Figure 1.)
The
first important thing is a good seat harness.
My seat harness is a modified Gibbs style. It has a back support and a seat support on
it. (Not shown in the drawing.) I have
been working on a more comfortable seat harness that supports your bottom so
that you can have loose leg loops.
Hopefully this will eliminate the Harness Hang Syndrome. The second important thing is a chest
harness. (See CHEST HARNESS.) They must be connected together since rescue
work requires that the seat harness be connected to the chest harness for safety. (See CHEST TO SEAT CONNECTION.) I use two-inch webbing for all of my
harnesses because it is more comfortable.
Notice in Figure 1 that my chest rope attachment is higher up than the
regular frog systems. Being more upright
helps you climb the rope and allows your rest periods to be more relaxing. It also will allow a rock climbing harness to
be used, but a caving seat harness is the best for changeovers.
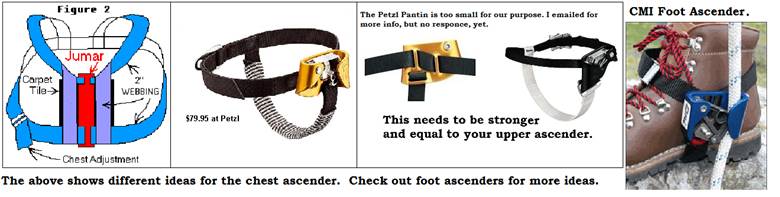
CHEST HARNESS
The
chest harness is hand made using a Sewing Awl. (See Figure 2.) It has a webbing strap around the chest just
under the tender area of the armpits and two shoulder webbing straps connected
in back. The webbing around the chest
includes an adjustable connection device making it comfortable for both male
and female users. The chest webbing and
shoulder webbing are sewed to a piece of carpet tile (for padding) and through
a Jumar ascender. I used a Jumar ascender because that
is what I had and that forced the use of a carpet tile piece. Other ascenders will also work if you can keep them in the proper position. (See
the "CMI foot ascender above) Use a left-handed Jumar here for a
right-handed person. The webbing
should be sewn tightly and attached securely to the Jumar so that the Jumar is
held upright and as high as possible on the chest. The chest strap goes through the Jumar's
handle and is sewn tightly to the Jumar.
The shoulder straps go through the top hole of the Jumar. I added two short webbing straps, one on each
side of the Jumar. These straps are sewn
to the shoulder straps and to the carpet tile and to the chest strap. These short webbing straps help to prevent
the shoulder and chest straps from pulling out of the carpet tile and the
straps hold down the shoulder straps if the Jumar is broken. The Jumar's opening for the rope is held away
from the body. The Jumar is free to
operate smoothly but it is sewn securely to the chest harness so it will not
move on the chest. If all was done
correctly and you were lying on your back, you could be picked up by the Jumar's
handle like a suitcase. This Jumar, when
connected to the seat harness properly and on rope, will allow you to rest in a
seated position.
My
chest harness was made for my chest, but I would suggest that you make this
chest harness with adjustable shoulder straps as well as the chest
adjustment. This will allow you to
custom fit the harness to several sizes of people. These adjustments, when loosened, will make
it easier to connect the chest harness to the seat harness. (Take note of the "CMI" device
pictured above. It would really help in
the construction.) Once this connection
is made, you can then tighten the straps.
The chest harness connection to the seat harness needs to be too tight
when standing, but very comfortable when sitting, or on rope.
CHEST TO SEAT CONNECTION
Connecting
the chest harness to the seat harness is done with the best one-inch
webbing. I suggest a piece that is about
four feet long. Some people just make
this connection from the bottom hole in the Jumar and to the seat harness, but
I want you to tie in several things for safety.
Find the halfway point. Place one
end through the top Jumar hole and through the shoulder webbing loop, that is
in that hole already, and tie in the shoulder webbing all with an overhand
knot. This webbing will also be
connecting the upper ascender’s locking biner, so leave a finger space of room
for it. (See Figure 3. The green
webbing.) Tie the overhand knot.
Overhand
knot procedure:
Put both lengths of webbing in your left hand, palm down. The attached items would be to the left of
your left hand. The two ends of webbing
should now be considered one. With the
right hand grab the two ends and put the webbing on top of the left hand to
form an eye or loop. Now use your left
hand's thumb to pinch the loop so you can hold this loop in your left
hand. With your now free right hand grab
the webbing ends and put them through the eye from the bottom side to the
top. Pull tight to make the knot.
(Take
note of the "CMI" device on figure 2.
It would really help in the construction.)
The
end loop should be neat and about two inches long and connected through the top
hole of the Jumar and all those things mentioned above. Adjust if necessary. Now place one loose end through the bottom
hole of the "Chest Jumar" and tie a water knot. (The water knot is an overhand knot
tied on one end of the webbing with the other end laced into the knot by
following the webbing's end into and through the knot to the other side of the
knot.) If all was done right, the
webbing should be smooth and tight when one finger is placed in the top loop
above the Jumar. The webbing should be
near the rope-guide cam area of the Jumar but on the other side of the metal
rope guide. The seat harnesses screw
link can now be placed in the bottom hole of the Jumar, and that webbing loop
for safety. If this connection is to
tight, and you are really hunched over, then tie another water knot below that
last knot in the loose ends of the webbing to make the connection the right length. Remember that the chest harness connection to
the seat harness needs to be too tight when standing, but very comfortable when
sitting, or on rope. The ends should be sewed back onto it’s self so the knot
won’t slip apart. Also sew the webbing
to the carpet tile straps and onto the chest loop so that the top of the loop
maintains a finger space. (See Figure 3.
The green webbing.)
If
the above webbing is too short to make the seat harness connection you can
always take another piece of one-inch webbing three feet long and place one end
through the bottom hole in the Jumar and through the webbing. Be sure it's through the webbing loop and the
bottom Jumar hole because that's your "safety connection". The ends should be tied with a water knot at
a length that will allow you to connect the webbing to your seat harness with a
stainless steel screw link or another strong half-round screw link, a locking
biner is not recommended. (See Figure 3
and Figure 1.) I like to secure the ends
by sewing them down after the final adjustments are made. (The CHEST
TO SEAT CONNECTION procedure could be all done with one piece of webbing if
two pieces were needed. ((See Figure 1’s
green webbing.)) This connection to the
seat harness needs to be done correctly so that the chest ascender doesn’t ride
up into your face when you are on rope.)
This extra spacing between the seat harness and the chest rope
connection point makes my system different from the standard “Frog” system.
CHECK IT
If you assembled the chest harness and connected the seat harness connection
properly you will stand hunched over. If
you didn't, and you are standing straight up, then the chest harness will ride
up and be in your face while you are on rope.
Tighten the above paragraph's loop or make other adjustments to fix this
problem. (Like tightening the shoulder
straps.) A properly adjusted harness
allows you to be in a comfortable sitting position off rope, or on rope even if
you are unconscious. When not on rope I
loosen the chest harness with the adjustable chest straps (or shoulder straps)
so I can straighten up when walking or standing.
COW'S-TAIL
A safety ascender or cow's-tail! Some
climbing systems really need a safety ascender when making a changeover from
rappel to climb, or climb to rappel, or when passing an obstacle, or anchor
point. So I said to myself: "Why not incorporate it into the basic
system. No chance of dropping it
then." I use a combination
"Inchworm" / "Frog" climbing system. This system uses a safety Jumar or
"Action Jumar" (my name for clarity) and it has two things attached
to the bottom hole in the Jumar. (See
No. 1 and 2 below and Figure 4.) I used
the best one-inch webbing for all of these.
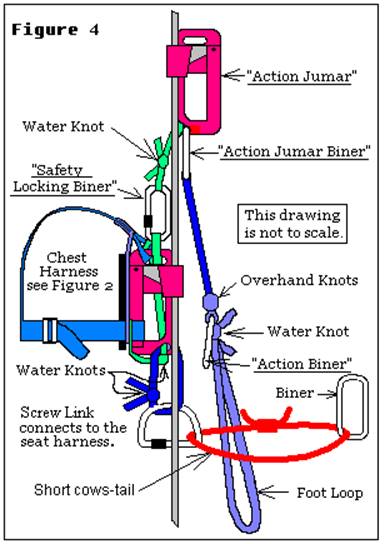
1. This attachment is the safety
attachment. Clip in a locking biner into
that finger space in the top hole of the “Chest Jumar”. We will call this the "Safety Locking
Biner." Be sure to clip it onto the
webbing only that is in the top hole of the Jumar. This webbing is your safety connection if the
chest harness Jumar is broken. It
connects to the seat harness. (See
Figure 4.) To make the next webbing
measurements easier put on your seat harness and your chest harness and connect
them together. Clip your chest harness
Jumar onto a suspended rope and sit in the harness. While hanging on the rope, clip on another
Jumar (I call this the "Action Jumar".) above your "Chest
Jumar." Use a right-handed Jumar for a right-handed person. Grasp the "Action Jumar" in the
handle with your right hand and put your left hand on the top and sides, then
slide it up the rope as far as it is comfortable. This is the travel length that you can
use. (I get about 15-16 inches.) Be sure that the rope in the rope-guide cam
is close to your head. This Jumar should
be in a position so you can work the release easily with your right thumb. With a loop of webbing tie a water knot
connecting the bottom hole of the "Action Jumar" and through the
"Safety Locking Biner" that is clipped onto the loop at the top of
the chest harness Jumar. Be sure that
the "Safety Locking Biner" is held up tight with the same travel
length after your water knot is tight.
(See Figure 4.) I sewed the
webbing together at a point close to the "Safety Locking Biner" so
the biner doesn't get hung up sideways in the webbing. I also sewed the ends down once the final
adjustment is done. The final adjustment
is done after you have used the system for awhile.
2. Attach a non-locking
biner into the bottom hole in the "Action Jumar" and include one side
of the loop of webbing that is already in the hole for safety purposes. This biner
will be called the "Action Jumar Biner." (See Figure 4.) While you are
suspended on the rope and with the "Action Jumar" up as far as the
attachment to your chest harness will allow, attach a piece of webbing about
eleven or more feet long (depending on your height) to the "Action Jumar
Biner". To do this, find the
halfway point and put one end through the "Action Jumar Biner." Pull one end down so that the other end is
about a foot and a half below your navel.
The loose webbing should now be hanging in front of you. Grab the two lengths at about chest high and
tie an overhand knot in the webbing with the knot at the midpoint of your
"Chest Jumar." Tie another
overhand knot one inch below that. Now
tie a water knot with the two ends. The
two ends loop should be big enough so you can place both feet and your knees in
this loop comfortably; this is your leg resting position. Your knees should be held horizontal with the
floor or slightly higher. Adjust this
water knot so the legs are in that position.
You may need to adjust this again after you see how it works, because it
is your foot loop too. Spread apart the
one-inch section between the two knots and put in a non-locking biner. This is the "Action Biner." (See Figure 4.) After you have used this system and you like
the foot loop where it is, you then can sew the ends down on the water
knot. Note: The orange loop and biner is
a short “cows-tail” for rebelay connections.
Instead of placing it in the screw link, as shown, loop it on so it can
be removed without unscrewing the screw link.
RAPPELLING DEVICE AND EXTRA ITEMS
A
standard Rack or SRT (Single Rope Technique) for rappelling is locked onto the
seat harness screw link with a locking biner or just directly into the screw
link. Notice here that a standard Rack
is used with my design. This is possible
because of the "Chest Jumar's" position on the chest and the use of
the "Action Biner." This
concludes the construction.
Extra
items for all the features, would be: a pulley, one locking and two non-locking
biners, eighteen inch loop of small diameter climbing rope, and about nine or
more feet of small diameter climbing rope for the 2 to 1 personal rescue procedure. For rescue and a hauling system a twenty-foot
piece of one-inch webbing and a Prusik Minded Pulley "PMP" are nice
to have. Note: Search and rescue
requires a lot of locking biners, so you might want to just buy them.
NO CHICKEN LOOPS
Why
such a big foot loop and no chicken loops on the feet? Chicken loops indicate to me that the system
will let you go upside down if one component fails. No one should ever have that happen! If your system would do it, fix it with a
safety connection! My system does not
need the chicken loops because if one component failed it would not let the
person hang upside down by their feet.
You can use the big foot loop to climb with one foot or both. When
climbing, and you want to rest, the big foot loop is used to put your feet and
your knees in so you can rest your legs completely. Your legs now make a nice flat place to put
things on that you want to set down temporarily. If the "Action Biner" is clipped to
your descending device or above it on a long free drop rappel, the big foot
loop can support your feet and help relieve the pressure on your legs caused
from the harnesses leg loops. You can
also attach your chest to the rack or rope to help you stay in the upright
position on the rappel.
HOW IT ALL WORKS
With
both Jumars on the rope, sit suspended.
You now can put one or both feet into the foot loop. Raise
your foot loop and leg(s) and at the same time slide the "Action
Jumar" up as far as it will go with both hands placed as before stated
during the construction. (I like to use
both hands for exercise.) Stand in your
foot loop and at the same time pull down on the "Action Jumar" and
toward your "Chest Jumar."
(Your "Chest Jumar" should allow the rope to feed through it,
but sometimes it doesn't because the rope is very short below you. You can pull the rope down with one hand or
trap the short end with your heels for starting.) Next, sit down in the harness and repeat the
process. Raise your foot loop….. Etc. When I am against a wall, I use one foot for
balance and one foot in the foot loop.
The large foot loop enables me to switch feet easily. This sit-stand method of climbing can easily
cause a bouncing rhythm when you climb.
If you do this, the rope above you may be sawed in half by a protruding
rock. To prevent the bouncing rhythm
from occurring, make the end part of your movements with a smooth gradual
stop. Note: All Frog systems, and mine, need to be adjusted
just right to be efficient.
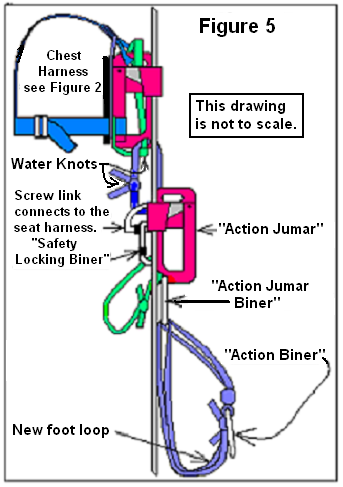
A SECOND CLIMBING MODE
Make
this second climbing mode like Figure 5.
To do this "on rope", first tie a loop on a bight, of the rope
that you are climbing, below your Jumars.
Clip your "Action Biner" onto the loop and to your seat
harness screw link for a safety connection.
Remove the "Safety Locking Biner" from the position shown in
Figure 4 and clip it onto your seat harness screw link. (See Figure 5) (Never unlock a locking biner unless you will
still have two points on the rope connected to your harness like we do
here.) Move the "Action Jumar"
below the "Chest Jumar" and clip it onto the rope. Unclip the "Action Biner" from the
screw link and the loop. Untie the loop
from the bight of rope. Take the bottom
of the foot loop and clip it into one of the non-locking biners below the
"Action Jumar" forming a new foot loop. You now can use the sit-stand method with one
finger pulling up the bottom Jumar, or put a bungie cord in it instead of your
finger. You can climb up or down very
easily. This position is ideal for
climbing up over a difficult lip where the rope is on the ground at the top of
the climb and you can't slip your top Jumar above the lip. Normally, with the first climbing mode, I
just put my feet on the wall up real high and push myself out away from the
wall and that action allows me to move my “Action Jumar” up over the edge so I
can continue to climb.
DOWNCLIMBING
With
both Jumars on the rope as seen in Figure 4, sit suspended. Lift your feet up
and move the "Action Jumar" down close to the "Chest Jumar"
and lock it. (Raising the Jumar slightly
and at the same time releasing the cam with your thumb will releases the rope,
then you can slide down the "Action Jumar" and release the cam.) Stand
in the loop and move the "Chest Jumar" down, (using the thumb release
method), by squatting down almost as far as you can go and then lock it. Sit down and raise your feet and move the
"Action Jumar" down close to the "Chest Jumar" and lock it. Stand
in the loop.......etc. I found that
the left hand operating the "Action Jumar" and the right hand
operating the "Chest Jumar" made this downclimbing quite efficient.
RESTING
When
you need to rest, the chest harness Jumar holds you in your last position. If you put the "Action Jumar's"
foot loop at the right height you can rest in a seated position. In some other systems, when you stop
climbing, you have to squat down to get a device to jam so you can rest your
muscles. Then you have to waste energy
by standing back up to continue climbing.
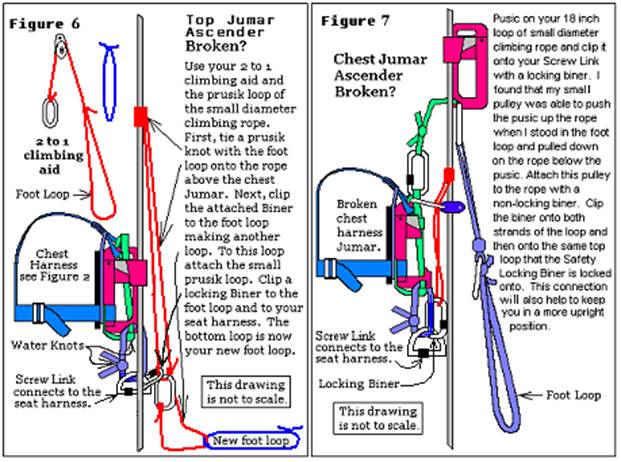
IF ONE FAILS
If
one Jumar should be broken or damaged by a rock, you still have one left to
climb with. This is done by looping the
rope, below the Jumar, around one raised foot.
Bring up the down side of the rope and put it next to the rope above
your foot. Grasp the two ropes in one
hand to make a crude ascender. The
sit-stand method still works up or down, it just takes longer and more
energy. You have to keep making another
crude ascender each time you use it. You
can also use your rescue 2 to 1 climbing aid and your eighteen-inch loop of
small diameter climbing rope, from your extra items, to replace the broken
Jumar. (See Figures 6 & 7.)
THE CHANGEOVER
The rappel changeover to
ascend. I put on my climbing system when I
rappel. You never know when you may have
to change directions of travel when on rope.
(See Figure 4.) First you tie off
your rappel device, then clip your "Action Jumar" onto the rope above
the rappel device by at least 8 inches.
Stand in the foot loop and clip on your chess jumar above the rappel
device. Then remove your rappel device
from the rope. Start climbing.
The climbing changeover to rappel. Just stop
climbing when the "Chest Jumar" is very near the "Action
Jumar." You now have access to the
rope below your "Chest Jumar."
Make sure your descender is locked to your seat harness’s screw link
before this procedure. Place your
descending device on the rope as high as you can below the "Chest
Jumar." Lock it off. To remove your "Chest Jumar", your
weight should be on the foot loop so pressure is relieved from your "Chest
Jumar." After removing the
"Chest Jumar", sit down in the harness, raise both feet that are in
the foot loop, and remove the top Jumar.
You may have to lean forward to do this.
Release the descending device's lock carefully and rappel down. If, inadvertently, you let the descending
device slip down so far that you can't get your weight off of the top ascender,
just clip the "Action Biner" onto the rope above the locked off
descending device. Stand in the foot
loop and move the top Jumar down enough to get your weight onto the
descender. (Some people have to remove
the foot loop from the "Action Jumar Biner" to make this work.) Remove the "Action Jumar" and the
"Action Biner" and you are ready to rappel. (Be sure to put back the
foot loop on the "Action Jumar Biner" if you removed it.)
The tyrolean traverse
changeover from a vertical rope. You just climb up, or down, so you can get
your seat harness as close to the tyrolean traverse as you can. You will need from your extra items, the
pulley, the eighteen-inch loop of small diameter climbing rope, and a locking
biner. Use your "Action Jumar
Biner" to hold them temporarily. Without
unlocking the seat harness screw link, put a bite of the eighteen-inch loop
through the seat harness screw links center area. Then take the other end of the loop and put
it through the bite loop, trapping the loop on the seat harness screw
link. Then use the extra locking biner
and clip it onto the loose end of the loop.
This now becomes an extra cow's-tail.
(Or you can make this cows tail like the orange loop in Figure 4, before
you get on the rope.) Put the pulley on
the tyrolean traverse and clip that locking biner onto the pulley and lock
it. You may have to put your legs over the
tyrolean traverse and raise your stomach to clip the locking biner, or just
stand in your foot loop to clip it on.
Another way would be to use your "Action Biner" by clipping it
onto the tyrolean traverse rope and putting your feet in the foot loop to raise
your stomach. The "Action
Biner" is also used as a second point on the rope. Once you have locked the locking biner onto
the pulley, downclimb so that almost all of your weight is on the tyrolean
traverse pulley. You may have to
unconnect the second point "Action Biner" to do this. Then put the "Action Biner" back on
after the downclimb. Unclip your
"Chest Jumar." Place some of
your weight in the foot loop and pull yourself up the rope so your "Action
Jumar" attachment is loose. Hold
yourself in this position with one hand while you release your foot connection
and with the other hand remove the "Action Jumar." If your tyrolean traverse is at a high point
you can go for a ride by letting go, if that is safe to do. Watch out for your hair, or whatever, getting
caught in the pulley. If a ride is not
appropriate, then go hand over hand down the rope. To rest, you can clip on your "Action
Jumar" on the tyrolean and put your feet in the foot loop. The "Action Biner" is still
attached to the tyrolean traverse rope for the second point on the rope.
For a really steep tyrolean
traverse. In this situation you may want to clip on
your "Chest Jumar" and your "Action Jumar" above the pulley
and downclimb until it's not so steep. Be
sure to attach both Jumars to the tyrolean traverse in such a way that you
don't trap the vertical rope that you are leaving. Once you get to the bottom of the tyrolean
traverse sag and you want to go up the other side, use your "Action
Biner" as your safety. Take
everything else off the rope except the pulley and the loop hooked to your seat
harness. The eighteen-inch loop that was put on the seat harness will allow you
to turn around without binding the pulley.
If you need to rest at this time, you can use the "Chest
Jumar" to lock onto the eighteen-inch loop strands to hold you in an
upright position. This will also help
you to get closer to the tyrolean for easier traversing. Don’t forget your foot loop for your
feet. To continue up the other side, I
use my "Action Jumar" to pull me up and as my body swings upward I
push up the "Action Jumar" some more.
You will find a rhythm that works.
If it gets really steep, or hard to do, connect on your "Chest
Jumar" and climb up the rope. Other
variations may be available to you at this point, experiment and enjoy.
Upon
reaching the other end's down rope, or up rope, just clip on your "Chest
Jumar" and your "Action Jumar"; remove the "Action
Biner" and climb up so you can take off the pulley attachment. You are now ready to climb up or down.
PASSING OBSTACLES
Climbing past a knot or
anchor point. Move your two Jumars close together and close
to the object. Tie a loop with a bight
of the rope, that you are climbing, below the obstruction and clip your spare
biner on it and to your seat harness screw link for a second point safety. Then move the Jumar that is closest to the
object, past the object. Downclimb or
climb up to put the remaining Jumar close to the object. Move the first Jumar some more and then pass
the object with the last Jumar. Remove
the spare biner and the bight loop from the rope. Your “Action Biner” may work as your second
point safety when connected above the obstruction.
To change ropes. Tie a loop with a bight of the rope, that you are
climbing, below your ascenders and clip your spare biner on it and to your seat
harness screw link for a second point safety.
Move your "Action Jumar" onto the other rope, shift your
weight and move your "Chest Jumar" to the other rope. Remove your second point safety connection
and the loop that you made. Resume
climbing.
To rappel past a knot. Execute a changeover to the downclimbing
mode. Pass the knot, and then change
back. Don't forget the second point for
safety.
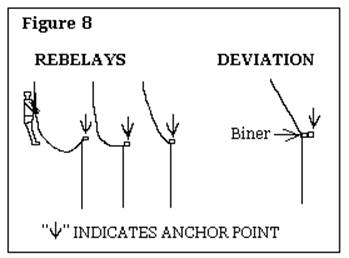
REBELAYS (See Figure 8.)
To
rappel past a reanchor, a looped rebelay, a loose rebelay, or a tight rebelay,
all you have to do is change over to climbing mode and downclimb past the knot,
or the anchor, or whatever. Use your
"Action Biner" or the short cow's-tail, (See Figure 4) or both as a
second point safety. Change back to a
rappel and you are on your way.
DEVIATION (See Figure 8.)
To
rappel past a loosely redirection biner rebelay (deviation) rappel an inch or
two below the biner and lock off your descender. Take your "Action Biner", or your
"Action Jumar Biner", and clip it to the rebelay anchor. Put your weight on the foot loop. Move the redirection biner from below your
rappel device and attach it on the rope above your rappel device. Put your weight back onto your descender and
unclip the "Action Biner", or your "Action Jumar
Biner". Unlock your descender and
finish the rappel.
When
climbing up and past a rebelay, treat it like any other obstacle. Remember, you can use an "Action
Biner", “cow's-tail”, or an "Action Jumar Biner" to help you
shift your weight. Try to keep two safe
connections at all times.
CLIMBING SLOPES
When
ascending a slope, the foot loop is not needed.
Secure your foot loop out of the way by clipping it onto your
"Action Biner" or your "Action Jumar Biner."
TANDEM CLIMBING
The
"Action Biner" is useful when you are on the top of a
"tandem" climb. The
"Action Biner," when clipped to the rope, will redirect the rope away
from your crotch. This makes you more
comfortable, helps to keep you more upright, and makes your climb easier.
ROPEWALKER SYSTEM
Some
people just have to have a ropewalker system.
On my system, for the very long climbs, I can add a foot ascender
attached to the ankle/foot area on one foot.
A bungie cord attached to the top of the ascender and to the harness
makes this work very well. Your other
foot would still be in the big loop.
Each leg is moved up separately like climbing steps.
RESCUE
If
you need to rescue someone who is on the rope and you are below him or her,
this system will let you climb past. You
just treat them like any other obstruction, except that it is more
awkward. As you pass the person, clip
onto the upper part of the person's harness with your extra biners and webbing
and then to your seat harness or use your 18-inch loop clipped onto your seat
harness for the "Pick-off" rescue.
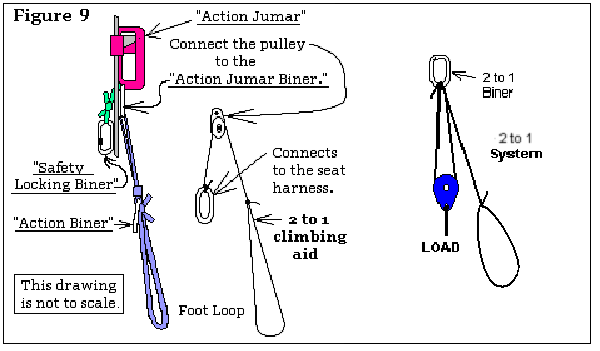
2 to 1 climbing aid
I
found some people so heavy that I could only lift them about one or two inches
at a time. This was unacceptable to me,
so I found that a 2 to 1 climbing aid was helpful. This aid can also help you
climb with a heavy pack that is attached to your seat harness. (See Figure 9.) From your extra items, clip the pulley onto
your "Action Jumar Biner" and make a new foot loop from the long line
of small diameter climbing rope. Copy
the one that's on your system, but leave off the extra knots and the
"Action Biner." Take the free
end of the rope and put it through the pulley.
Tie the end to a non-locking biner and attach that biner to your seat
harness screw link. With the
"Action Biner" missing, you now can raise your legs higher in your
new foot loop. By yourself, you can
almost get about the same amount of climbing distance. With a heavy pack, you still climb with the
"Action Jumar" as before, but much easier. It helps to have the loaded rope in front of
your foot loop and between your toes, maybe?
(In rescue, I found that the
2 to 1 climbing aid is better when built upside down for a foot loop use. See figure 9’s right side. This way is used to just get the victim loose
from the rope and connected to your harness for a double rappel.)
If
you want to rescue someone who is below you, you may have to use a hauling
system to haul him or her all the way up or you may have to downclimb all the
way to them so that you can do a “Pick-Off”.
If you have to downclimb, I think you will be glad to have my system for
that. The setup in figure 5 also works
very well for downclimbing. The short
cow's-tail works best for rappelling with another person attached to it.
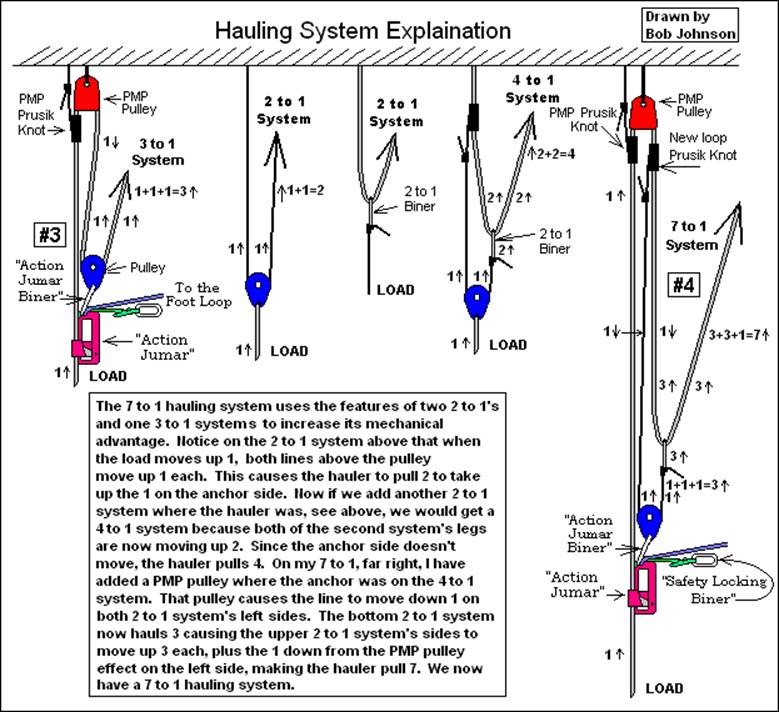
HAULING SYSTEMS
The middle bottom of Figure 10 shows a
technique to raise a loaded rope using my "2 to 1 climbing aid". Systems #1 through #4 use a PMP, Prusik
Minded Pulley. In the description below,
we will assume that you are to haul up someone who is on the loaded rope. Systems #1 through #3 are illustrated in the
"British Columbia Cave Rescue" document that was shown to me at a
"Small-party Cave Rescue Techniques and Considerations" class that I
attended.
The
first thing the rescuer needs to do is to check the anchor to make sure it is
safe. Tie a prusik knot onto the rope
with your 18-inch loop of small diameter climbing rope and secure the loop to
the anchor. We will call this the
"PMP Prusik Knot", see Figure 10 system #1 for this description. Attach your PMP to the anchor and then attach
your "Action Jumar" to the load rope as shown. Attach your small pulley to the "Action
Jumar Biner". Untie the foot loop
in your "2 to 1 climbing aid", see the rectangular box in Figure 10,
and run the small diameter rope as shown in system #1. Attach the 2 to 1 Biner onto the "Action
Jumar Biner". Pulling the small
rope in the direction of the arrow will give you a 3 to 1 mechanical advantage
hauling system.
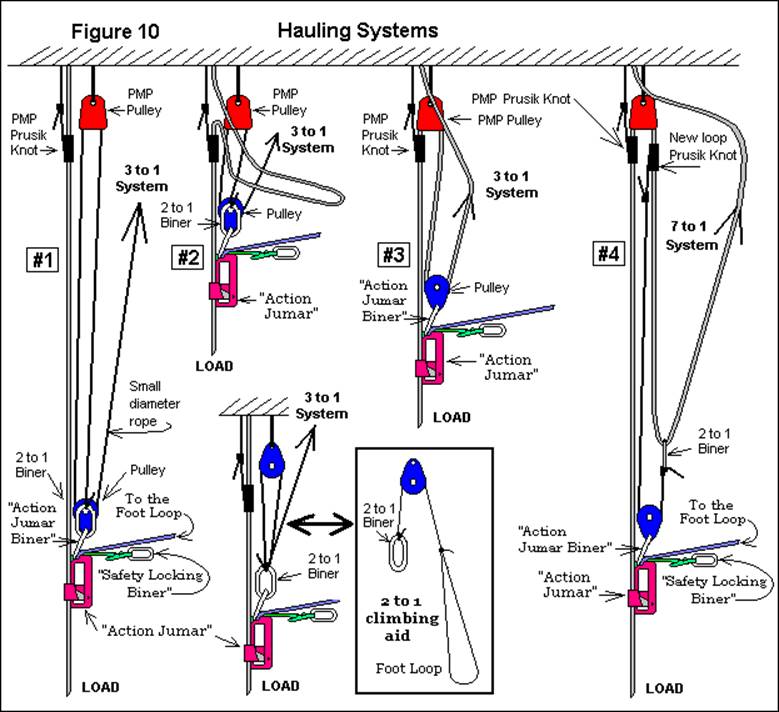
Pull
the small rope until the two pulleys are close together. Set the "PMP Prusik Knot", or the
"ratchet (or capture) Prusik", as shown in system #2. Slowly release the small rope to place the
load weight onto the "PMP Prusik Knot". Now move the "Action Jumar", or
"haul" Jumar, down the load rope until the small rope end is near the
small pulley attached to your "Action Jumar Biner", this resets your
system. A knot here at the end of your
small rope is a good idea to stop the small rope end from going through the
small pulley. Now pull the small rope
again until the two pulleys are close together or until the load rope loop,
that you are now making, is big enough to make system #3. Set the "PMP Prusik Knot" before
releasing system #2 and making system #3.
Notice in system #3 that the small rope has been replaced with the load
rope. System #3 is also a 3 to 1 hauling
system, but can be worked more efficiently because the "PMP Prusik
Knot" will set itself. To operate
system #3 you only pull on the rope, release it, move the "Action
Jumar" down the load rope, and pull on the rope again. You will now be able to haul the load /
person all the way up.
System
#4 is used when the load weight is too much work for the hauler using a 3 to 1
mechanical advantage. In this new
arrangement I have taken the "2 to1 climbing aid's" foot loop and
retied it into a one-foot long loop. Tie
a prusik knot with this new loop onto the rope as shown. Place your pulley on the small rope and clip
it onto the "Action Jumar Biner". Take the main rope and clip it onto the 2 to 1
biner as shown in system #4. With this
new arrangement the hauler has a 7 to 1 mechanical advantage system. Operation: Pull the rope until the 2 to 1
biner touches the new loop prusik knot.
Relax the rope and move the new loop prusik knot up to the PMP. Now pull the rope again until the 2 to 1
biner touches the new loop prusik knot.
Relax the rope and slide the "Action Jumar" down the load line
until the 2 to 1 biner hits your pulley, thus resetting the system.
DISCLAIMER
Caving
and climbing ropes or rappelling is dangerous.
If you would like to build my system, go ahead and do it, but have
someone who has been doing vertical caving for many years check your work. After you've constructed the system, also
have them make sure you are using it correctly.
The frog system works best when adjusted right and with people of a
slender to medium build, but with my upper attachment it helps people with a
heavier upper build. People who have
been doing vertical rope work for one year or less are in the most dangerous
time, so don’t learn from them.
QUESTIONS
If
you have questions about my system or would like to communicate with me, I can
be reached by email: verticalbob1@gmail.com . I'm also in the NSS Members Manual, in
Oregon.
MECHANICAL ADVANTAGE HAULING
SYSTEMS ARE EXPLAINED BELOW: